Building your own pickleball court
Want to create everlasting memories right in your own backyard? Build or create your own pickleball court! It’s also an excellent way for family and friends to enjoy pickleball games together and create unique memories. And you’ll get to play, practice, and improve your pickleball game (without the commute).
Our guide will cover:
- The costs
- The easy way (with a portable net)
- How to repurpose a tennis or basketball court
- Building your own court
- Other tips for setting up a pickleball court
The costs
Before discussing the different options for creating your pickleball court, let’s discuss costs. One of the biggest questions about pickleball courts is: “How much does it costs to build your own permanent court?”
Building a court costs $45,000 on average but can vary greatly depending on things like whether you decide: to use asphalt or concrete, have a cushioned court, fencing, etc. We’ll cover this more in the later section on building your own court. Building a permanent pickleball court involves a fair amount of money, time, and planning. It can be well worth the commitment, but there are other quicker and cheaper options as well.
You can also setup less permanent, or portable courts, for $100-500 (cost of a portable net, maybe some paint or tape line) and you’ll be ready for some quality pickleball play.
The easy way (with a portable net)
We’ve got you covered if you’re looking for an easy, less permanent setup. Creating a temporary or portable pickleball court is fantastic for:
- Summers
- Parties and get-togethers
- Practicing
- Getting the family into pickleball
Setup the court
Find a flat surface that can fit the 44 feet long x 20 feet wide court. Ideally, you also have enough space outside the court (running and hitting). The USAPA Rule Book recommends a 34 x 64 feet area (or a 30 x 60 feet area at the minimum).
It’s best to set up the court north-south to reduce the amount of sun that interferes with your vision and limit the impact of shadows.
Setup the net
According to the official pickleball rules, your net should be 22 feet wide, 36 inches tall at the two ends, and 34 inches in the center. (While regulation courts need to be 20 feet wide, you generally want a net about 2 feet wider so that you can extend the net a foot past the court’s sidelines.)
The easiest way to start your pickleball court is to buy a portable pickleball net. A portable net has many benefits, like easy transportation (to other courts or open areas) to play with friends and family. You’ll also be able to practice solo drills easily.
Many stellar nets are available, and buying a portable net will often return its investment 10x over quickly.
Do you want to choose the best portable net? Check out our picks for the 7 Best Portable Pickleball Nets.
Suppose you’re in a space-constrained space (like if you live in a big city like SF or NYC); you can also buy a half-sized portable pickleball net. It’s easy to set up in smaller spaces, and you can still get your practice or casual play in for fun. It’s also great for kids.
How to repurpose a tennis or basketball court
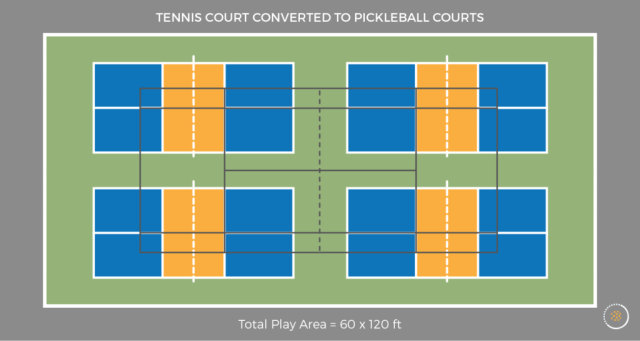
Since pickleball courts are relatively small, you could create more than one pickleball court when you repurpose a tennis or basketball court.
For example, you could fit four pickleball courts on a typical tennis court.
Similar to setting up your court the easy way, you can always take down the tennis net (or clear off the basketball court) and set up your portable net for play.
Setting up the lines
According to official pickleball rules, your pickleball court lines should be white. (It’s also one of the easiest colors to see and play with on an outdoor court.) The color matters less if you’re not building a permanent court. Ideally, you want a color that contrasts enough with your surface (especially on open concrete or asphalt areas, tennis or basketball court, and driveways). You also want a color that’s easy to see clearly.
There are several ways to draw the lines:
- Buy court chalk — Cost-effective and easy. (Option: PickleballCentral’s Court Line Chalk)
- Create your own liquid chalk — Cheaper, often stronger contrast.
- Buy tape — More work to set up but lasts longer. For every new regulation-sized court you’re lining, you’ll want 198 feet of tape. (Option: Green Frog Tape, which also does not interfere with the white tennis court lines.)
How to build your own pickleball court
How much does it cost to build your own pickleball court?
While it depends, building a pickleball court costs $45,000 on average (or $15 – $40 per square foot). Costs for a permanent pickleball court can vary greatly depending on things like whether you:
- Use asphalt or concrete (or if you’re resurfacing an existing court or open area)
- Wanted the court cushioned or not
- Have grading and drainage needs
- Install fencing, windscreens, shade, or lighting
- Install electric or water
Going forward, after you’ve built your pickleball court, you’ll likely want to resurface the court every 5 years or so, which costs on average $4,000.
Setup the court
You’ll want to find an area that’s ideally 34 x 64 feet (although you could go as low as a recommended 30 x 60 feet). Important to have enough space for the 44 x 30 feet court plus room for maneuvering and hitting.
You’ll want to set the court up north-south. A north-south setup helps reduce the amount of sun and glare obstructing the playing vision and limits the impact of shadows.
Build a concrete vs. asphalt pickleball court
Choosing the right court surface is important. For an outdoor court, your two main choices are:
- Concrete: A concrete surface will create the most durable playing surface, which will increase the lifespan and value of your pickleball court.
- Asphalt: An asphalt surface is typically more affortable than concrete. It’ll still provide a good playing surface, but you’ll have to do more maintainence work to keep it well-maintained. Asphalt surfaces have a shorter lifespan than concrete surface, but you can increase an asphalt court’s lifespan with good maintainence.
Generally you’ll want to resurface your pickleball court every 5 years. You can go longer if it’s well-maintained and holding up well for your needs. Keep in mind concrete will likely last longer than asphalt. If you’re using it for important gameplay (pro practice, tournaments, etc.), you’ll want to resurface it more frequently. Generally it costs $3,500 – $5,000 to resurface a court.
Choose your net
You’ll likely want to purchase and install a permanent net system if you’re building a pickleball court. However, you have two options here:
- Permanent net: Several racquet sports companies (like Wilson and Pickle-ball Inc) make affordable, high-quality permanent nets and posts.
- Highly durable portable net: These nets are portable (and aren’t installed into the court) but can be used more permanently outside. Two good options to consider are:
- Trident Tru-Shot: https://trushotnets.com
- Dominator: https://dominatorhoop.com/product/dominator-rolling-pickleball-net/
We like the lifetime guarantee for the Dominator (though we have yet to read the fine print if any) and also like that they’re intentionally calling out that the durable net is rustproof (rather than just weather resistant).
Color the pickleball court
This is the fun part! For outdoor courts, USAPA recommends using 100% acrylic paint.
While tennis courts are generally limited to blue or green, you can choose any color for your pickleball court!
- Contrast the paint with the court lines. (USAPA recommends white court lines.)
- You’ll want to contrast with the color of your pickleballs, typically yellow, orange, or bright green.
- Remember that darker paints will absorb more light and be hotter for outdoor courts. A light court will be noticeably cooler to play on if you live in a hot or sunny climate. (Potentially up to 10-20 degrees cooler, depending on your color choice.) So you might want to consider a light grey color over black or dark green paint.
We generally recommend applying at least two coats of paint. It may be worthwhile to do an extra coat to prevent wear and tear and extend the life of your court surface. Pickleball courts generally have much higher foot traffic than other racquet sports courts because pickleball courts are smaller and often used for doubles play.
Creating a cushioned court
Create a cushioned court by applying multiple layers of acrylic with small rubber granules with a soft rubber squeegee.
It’s essential to have an even application. One of the best ways to do that is to:
- Pour the cushion product in small amounts to prevent piles of rubber at the end of the squeegee pull.
- Gently scrape high spots to even out the surface.
Generally, public courts are hard courts. Cushioned courts are gentler on the knees and joints and more conducive to higher-caliber play. You’ll find most private and tournament courts are cushioned.
Cushion pickleball courts tend to be more common than other court types (e.g. cushioned tennis courts and basketball courts) because of their smaller size. If you’re creating a permanent court that you’ll often be using, it’s worthwhile to consider cushioning it.
Other tips when you build a pickleball court
- Drainage: Typically, when you build an outdoor court (whether pickleball, tennis, or other), you’ll want to make it with a 1% slope for drainage. Otherwise, standing water breaks down acrylic and pavement. Also, if water collects, it takes more work and time to get the court dry enough to play again after rain.
- Leveling: As you use your court more, you’ll want to find an excellent way to level and patch your court. It could be to fix spots from the initial build or general wear and tear. For example, SportMaster’s acrylic patch binder is a good option that can be poured into lower spots (or patches) and scraped even or sanded down. SportMaster’s acrylic patch binder is liquid acrylic mixed with cement and sand.
Conclusion
At the end of the day, it can be easy to setup your own pickleball court! Depending on your goal and budget, you can create a portable court or a permanent court. You’ll create more memories with friend and family, get more outdoor time, and improve your pickleball skills.
Be sure to follow all official court regulations and consider any necessary resurfacing or repair for lonog-term use. Hope you get to create or build your own pickleball court and get to playing in no time with our guide!
Share your court setup in the comments or any tips and tricks we should keep in mind!